An Application Virtual Switch (AVS) enables virtual networking for applications. It acts as a bridge between virtual and physical network infrastructures.
Virtual networking is transforming how businesses manage their network architecture. An Application Virtual Switch streamlines this process by providing a dynamic, software-based interface that can manage network services more efficiently than traditional hardware. Designed to support high-performance virtual environments, AVS facilitates the direct communication between virtual machines and the physical network, enhancing data throughput and reducing latency.
By integrating seamlessly with virtualization platforms, AVS simplifies network configuration and automates many tasks, making network management more agile. It allows IT professionals to allocate, monitor, and adjust networking resources on-the-fly to meet the evolving demands of applications and services. Embracing this technology helps organizations reduce costs and improve scalability, which is crucial in today’s fast-paced digital landscape.
Credit: fastercapital.com
Table of Contents
What Is A Virtual Switch (vswitch)?
A virtual switch (vSwitch) operates within a virtualized environment, directing network traffic between virtual machines (VMs) and various networks. This key component of network virtualization mimics the functionality of a physical switch, facilitating communication and resource allocation for applications.
Diving into the realm of network virtualization, a virtual switch (vSwitch) plays a fundamental role. To put it simply, a vSwitch is a software application that allows virtual machines (VMs) to communicate with each other within a host computer or across connected hosts.
Unlike a physical switch that manages traffic within a local network, a vSwitch directs networking traffic more dynamically between VMs and external networks.
Key Functions Of A Virtual Switch
The virtual switch is no slouch when it comes to its responsibilities within a virtualized environment. Let’s bullet out these functions for clarity:
Traffic Management: Acts as a gatekeeper, controlling and directing network traffic between multiple VMs on the same physical host.
VLAN Segmentation: Provides isolation by separating VMs into distinct virtual networks (VLANs), bolstering security and traffic management.
Policy Enforcement: Employs network policies to ensure VM traffic adheres to established rules, such as access control lists and QoS parameters.
As these points showcase, a vSwitch is akin to a traffic cop and rule-enforcer all-in-one—ensuring smooth and secure network operations among virtual ecosystems.
Advantages Of Using A Vswitch
Now, you might be wondering why opt for a vSwitch in place of its tangible counterpart? Well, let’s break this down into tangible benefits:
Flexibility: Enables on-the-fly changes in network configurations without needing to tweak physical hardware, allowing for agile adaptation to varying needs.
Cost-Efficiency: Eliminates the need for excessive physical networking gear, translating into lower capital and operational expenses.
Security: Enhances security features such as isolation, firewalls, and intrusion prevention systems tailored for virtual networks.
These advantages reaffirm a vSwitch’s position as not just a cost-efficient solution but also a flexible and secure network management tool in virtual settings.
Challenges With Virtual Switches
Amidst its strengths, the vSwitch is not without its challenges:
Scalability Concerns: Needs meticulous management to scale effectively as more VMs are added to the system.
Complexity: More complex to configure and manage compared to traditional switches due to the intricacies of virtualization.
However, with a keen understanding and strategic planning, these hurdles can be addressed, allowing you to fully harness the power of virtual switch technology.
Vswitch Vs. Physical Switch
To sum up, a vSwitch is a virtual networking device that offers substantial benefits over traditional physical switches in terms of flexibility, cost savings, and security. As virtualization continues to be a driving force in IT infrastructure, understanding and leveraging virtual switches is key to optimizing and securing your virtual environments.
What Is A Virtual Switch Used For?
An Application Virtual Switch operates within a virtualized environment, routing network traffic between different virtual machines. It plays a crucial role in managing communication across virtualized applications, ensuring efficient and secure data transfer.
Virtual switches are a fundamental component in any virtualized networking environment. They operate much like traditional physical network switches, but with greater flexibility and without the physical constraints. Virtual switches allow virtual machines (VMs) on the same host to communicate with each other as well as with the broader network, facilitating an efficient and secure data flow.
Enabling Virtual Machine Communication
Segments traffic:
Virtual switches help in carving out distinct network segments that can isolate communication for specific virtual machines, ensuring sensitive or critical workloads remain private and protected.
Orchestrates network policies:
These switches enforce network policies at the virtual machine level. They apply rules for network access, bandwidth limitations, and quality of service, maintaining overall network efficiency and security.
Connecting Virtual Networks To Physical Networks
The bridge between virtual environments and the physical world is adeptly constructed by virtual switches. They take on multiple roles to ensure seamless operations:
Traffic routing:
Facilitating the smooth routing of traffic from virtual machines to physical networks, virtual switches ensure that data reaches its intended destination without bottlenecks.
Provides flexibility:
By managing the interconnection with physical networks, virtual switches offer the adaptability to dynamically adjust to different network loads and configurations.
Simplifying Network Management
In a virtualized setting, network management needs to be as agile and simple as possible. Virtual switches are instrumental in achieving this:
Centralizes management:
They provide a single point of management for networking settings across multiple VMs, drastically reducing complexity and the potential for manual errors.
Automates tasks:
Through virtual switches, administrators can automate routine networking tasks, such as virtual LAN tagging and traffic shaping, thereby streamlining operations and optimizing resource allocation.
Employing virtual switches effectively orchestrates network traffic and policies, bridges virtual and physical networks, and simplifies overall network management. Thereby, they serve as crucial gateways in advancing the efficiency and effectiveness of virtualized environments.
How Does A Virtual Switch Work?
An Application Virtual Switch operates by directing network traffic between different virtual machines on the same physical host. It acts as a software-based layer that efficiently manages communication within virtualized environments.
Understanding The Basics Of A Virtual Switch
A virtual switch operates much like its physical counterpart, but it exists entirely within software. Envision a traditional physical network switch that allows multiple devices to communicate; a virtual switch does the same but within a virtualized environment. At its core, a virtual switch connects virtual machines (VMs) to each other and to the physical network, bridging the gap between virtual and physical networking.
Components Of A Virtual Switch
Ports:
These are the interfaces through which virtual machines connect to the virtual switch, very much like the ports on a physical switch where cables are plugged in.
Uplinks:
These serve as the bridge between the virtual switch and the physical network adapters, allowing VMs to communicate with the outside world.
VLANs:
Virtual Local Area Networks are used to segment network traffic, increasing security and performance by partitioning the network logically, even though it operates over the same physical infrastructure.
How Traffic Is Managed
Imagine a busy highway system where each vehicle knows exactly where to go; that’s what a virtual switch does for data packets. By examining data packets and identifying their destination, the virtual switch efficiently routes traffic from one VM to another, or to the broader network.
The process is invisible to the end-user but crucial for maintaining a smooth, uninterrupted flow of information across the network.
Role Of Virtual Switches In Network Isolation
Security:
Virtual switches provide network isolation, which is the equivalent of assigning individual lanes to vehicles on a road, reducing the chances of accidents and enhancing safety.
Multitenancy:
By creating separate virtual networks, the switch allows for multiple clients or services to coexist on the same physical hardware without interfering with each other, like separate businesses operating in the same office building without disruption.
Resource Control:
Network isolation also helps in controlling resource access, ensuring that one VM’s traffic does not monopolize bandwidth to the detriment of others, much like traffic lights manage the flow of vehicles.
Scalability And Flexibility Offered
Deploying new virtual machines becomes as simple as a few clicks, thanks to virtual switches. No need for additional cabling or hardware adjustments; the virtual switch adapts and provides the necessary connectivity instantly. This scalability is a game-changer for businesses experiencing rapid growth or those with fluctuating resource demands.
With a virtual switch, network resources can be allocated, moved, or adjusted with unparalleled flexibility, all without the physical limitations that come with traditional hardware.
Uses For Virtual Switches
Virtual switches play a crucial role in managing network traffic for virtual machines, enhancing their communication efficiency. They enable seamless connectivity between virtual and physical networks, offering flexibility and control within virtualized computing environments.
Understanding Virtual Switches
Diving into the world of virtualization, one cannot overlook the pivotal role that virtual switches hold. These ingenious devices operate within virtualized environments, serving as a bridge between virtual and physical networks. Virtual switches cater to both the communication among virtual machines and the outside world.
Let’s delve into their practical applications, illustrating how they revamp networking efficiency and security.
Segmenting Network Traffic
Traffic management: Virtual switches can intelligently route traffic between virtual machines (VMs). This optimizes network performance by ensuring data packets take the most efficient path.
Isolation of environments: They allow for the creation of distinct segments within a network. This segregation is vital for maintaining discrete environments for different applications or user groups.
There’s an undeniable charm in how virtual switches maintain orderly traffic flow, much like a seasoned traffic police officer at a bustling intersection. Let’s uncover more uses that showcase virtual switching as an unsung hero in network management.
Enhancing Security
Policy enforcement: Virtual switches can apply security policies at a very granular level. This means each VM can have tailored security measures depending on its role and function within the network.
Access control: They are crucial for establishing who gets to interact with what within virtualized environments. By setting up access control lists (ACLs), virtual switches dictate traffic flow based on predefined permissions.
Imagine virtual switches as vigilant gatekeepers, deftly controlling access and protecting the sanctity of your virtual realm. Their potential as a security asset is as profound as it is valuable.
Simplifying Management
The beauty of virtual switches lies in their ability to simplify the complex web of network management. By centralizing the control, administrators get a streamlined platform to configure, monitor, and manage network settings across all connected VMs. Such convenience saves time, effort, and reduces the chances of human error.
Virtual switches thus become not just tools but impactful allies in network governance.
Supporting Advanced Networking Features
VLANs support: Virtual switches enable the implementation of Virtual Local Area Networks, enhancing network organization and efficiency.
Load balancing: They play a crucial role in evenly distributing network traffic. This ensures no single virtual network interface gets overwhelmed, maintaining a smooth and responsive network environment.
It’s evident that virtual switches aren’t just about connectivity; they’re about crafting sophisticated, resilient, and intelligent networks capable of adapting to diverse needs. Through these applications, virtual switches become crucial building blocks for modern network infrastructure, bringing agility and robustness to the forefront of virtualization.
Types Of Virtual Switches
Explore the dynamic world of Application Virtual Switches, integral for streamlining network traffic in virtual environments. Distinguishable from their physical counterparts, these software-based switches facilitate seamless communication between virtual machines, bolstering efficiency and security in cloud infrastructure.
Standard Virtual Switches
Diving straight into the deep end, let’s explore the foundational elements of application virtualization. Standard virtual switches are the essential building blocks that connect virtual machines to the network. Operating akin to a physical network switch, these switches mediate communication within the same host, creating a reliable internal network that ensures smooth data transfer between virtualized applications.
Distributed Virtual Switches
Centralized management: Unlike standard switches that are managed individually, distributed virtual switches offer the convenience of managing networking for a multitude of virtual machines across multiple hosts from a central point. This streamlines the process, saving valuable time and reducing complexity.
Consistent network configuration: Maintaining a consistent setup across various hosts is a breeze with these switches, as they use a uniform configuration that applies to all connected virtual machines. This uniformity significantly diminishes the chances of mismatched settings and human error.
Virtual Extensible Lan (vxlan)
Imagine a technology that expands your capabilities beyond the traditional bounds—VXLAN is just that. This overlay networking scheme utilizes MAC-in-UDP encapsulation, providing a layer 2 network on top of a layer 3 infrastructure. It effectively allows for the creation of a virtualized layer 2 network at scale, which is essential for environments with a high number of interconnected virtual machines all requiring unique network segmentations.
Switch-independent Virtual Switches
It’s important to point out the flexibility of switch-independent virtual switches. These switches can function without being tied to any specific physical switch, granting you greater agility in configuring your network environment. Emphasizing freedom, these switches can distribute workloads evenly without being bound by the constraints of topology, making network design and subsequent adjustments significantly less complicated.
Cisco Nexus 1000v
Advanced networking features: The Cisco Nexus 1000V is a testament to advanced networking solutions, boasting features that cater to sophisticated network configurations. Some of its capabilities include quality of service (QoS), security policies, and network monitoring, all designed to offer a high degree of control over virtual network traffic.
Integration with VMware: Specifically tailored to work seamlessly with VMware environments, this switch type integrates smoothly, thus enhancing the already robust virtual infrastructure offered by VMware. It brings to the table an enriched network experience that aligns with the versatility VMware’s ecosystem promises.
Exploring the world of application virtual switches unveils a landscape where flexibility, control, and scalability take center stage. These switches are paramount for impeccable network functionality in the realm of virtualization, much like the unsung heroes of the digital networking narrative.
They ensure not only connectivity but also the efficiency and security needed to meet modern-day networking demands.
Advantages Of Using A Virtual Switch
An Application Virtual Switch streamlines network traffic management, enabling seamless communication across virtualized environments. It fosters improved system security and resource optimization, crucial for efficient enterprise operations.
As we navigate through the increasingly digital landscape of modern business, the use of virtual switches has become a pivotal component for efficient network management. Virtual switches, operating within virtualized environments, offer a suite of benefits that enhance the flexibility and scalability of network infrastructure.
Let’s delve into the myriad advantages that these powerful tools provide.
Streamlined Network Configuration And Management
The ease of configuring and managing networks is a significant upside to implementing a virtual switch. Centralized management allows for:
Simplified setup: Deployment of network configurations can be done swiftly and uniformly.
Enhanced agility: Adjustments to network settings can respond in real-time to the dynamic needs of a business.
Increased Network Security And Isolation
Protecting the integrity and security of data within a network is paramount. A virtual switch reinforces this by:
Segmenting traffic: It effectively segregates traffic between different virtual machines, preventing unwanted data breaches.
Controlling access: Administrators can establish precise rules that dictate which resources each virtual machine can access.
Cost-effectiveness And Reduced Physical Hardware
Embracing the functionality of a virtual switch naturally leads to cost savings, here’s how:
Eliminating excess hardware: The need for numerous physical switches is reduced, resulting in lower capital expenditure.
Decreasing maintenance costs: With fewer physical devices, the cost and effort of maintenance are notably lessened.
Enhanced Performance And Resource Optimization
Efficient utilization of network resources can propel a business toward improved overall performance:
By deploying virtual switches, networks can benefit from:
Load balancing capabilities: This ensures that no single resource is overburdened, promoting better performance across the board.
Adaptive resource allocation: Virtual switches can dynamically allocate bandwidth to prioritize critical workloads.
Scalability And Flexibility For Growing Businesses
The capability to scale and adapt is essential for businesses eyeing growth. Virtual switches make scalability achievable with:
Dynamic restructuring: They allow networks to expand without extensive restructuring.
On-demand capacity: Virtual switches facilitate the seamless addition of new virtual machines and services as needed.
Incorporating a virtual switch into your network architecture lays the groundwork for a responsive, secure, and cost-efficient environment. Their unique ability to adapt to the ever-changing demands of business operations makes them an indispensable asset for any forward-thinking enterprise. By leveraging their benefits, organizations can ensure that their networks are not only keeping pace with current needs but are also prepared for future challenges and opportunities.
What Is The Difference Between A Physical Switch And A Virtual Switch?
A physical switch manages connections between devices on a local network by utilizing hardware ports. In contrast, an application virtual switch operates within a virtualized environment to direct traffic between virtual machines and networks, requiring no physical hardware.
Switching technology plays an essential role in managing network traffic. Understanding the key differences between a physical switch and a virtual switch can better equip network professionals and IT enthusiasts in optimizing their network environments. Let’s delve into what sets these two types of switches apart.
Physical Switch: The Traditional Network Controller
A physical switch, often referred to as a hardware switch, is a tangible device that connects computers, printers, and servers in a network. It operates on the data link layer of the OSI model to manage and direct the flow of data packets amongst devices on a local area network (LAN).
Connectivity: Physical devices are directly connected to switches through cables.
Location: It is a standalone device that typically resides in data centers or server rooms.
Hardware-based: It necessitates actual hardware for its operations and has a fixed number of ports.
Performance: Offers high-speed network performance that is influenced by its hardware specifications.
Power consumption: Consumes more power and may require cooling due to its electrical components.
Virtual Switch: Streamlining Networks In Virtual Environments
Contrary to a physical switch, a virtual switch works within virtualized environments. It allows virtual machines (VMs) on the same host to communicate as if they were connected by physical cables to a traditional switch, thus distributing data efficiently within a virtual network.
Let’s explore the characteristics:
Integration: Perfectly integrates with virtualization software, providing seamless operations in a virtualized environment.
Scalability: It can easily expand, with ports being added or modified through software configurations.
Resource sharing: Enables multiple VMs to share the same physical network interface card (NIC) effortlessly.
Energy efficiency: More energy-efficient as it leverages the existing power and cooling systems of the host machine.
Flexibility: Allows for on-the-fly policy changes and network management adjustments without physical modifications.
Through adeptly managing network traffic within various environments, both physical and virtual switches are integral in modern networking. Optimizing their use cases can lead to more efficient, secure, and scalable network infrastructures.
Credit: www.amazon.com
Frequently Asked Questions Of Application Virtual Switch
What is cisco application virtual switch?
The Cisco Application Virtual Switch (AVS) is a specialized virtual switch managed by the Application Policy Infrastructure Controller (APIC) for Cisco’s ACI.
What is virtual switch in VMware?
VMware’s virtual switches, known as vSwitches, link virtual machines and connect virtual to physical networks. They utilize the ESXi host’s physical network adapter (NIC) for connecting to the physical network.
What are the benefits of virtual switches?
Virtual switches simplify network management by offering centralized control and configuration, removing the hassle of managing individual physical switches. This streamlines processes, reduces complexity, and saves administrators precious time.
What Is The Difference Between Cisco Avs And Ave?
Cisco AVS, or Application Virtual Switch, was a component of the ACI fabric for virtual networking. Cisco ACI’s Application Virtual Edge (AVE) is the newer, software-based replacement offering enhanced features and flexibility.
Conclusion
The application of virtual switches revolutionizes network management and efficiency. They provide upgraded smooth connectivity, bolster security, and enhance control within virtual environments. As technology evolves, integrating such innovative solutions remains paramount for any forward-thinking enterprise. Remember, optimizing your network’s potential is just a switch away.
A Virtual Preamp Collection emulates classic preamplifier circuits in a digital format. It provides musicians and producers with a range of tonal options.
Exploring a Virtual Preamp Collection is like unlocking a treasure chest for audio professionals and enthusiasts. The collection typically comprises software-based models of iconic preamplifiers, celebrated for their distinct sound characteristics. By introducing these tools into a digital audio workstation (DAW), users can infuse their recordings with the warmth, depth, and nuances historically reserved for high-end analog gear.
These virtual preamps serve as a vital component in shaping the tone and vibe of a track, offering versatile applications, from polishing vocals to enhancing the grit on a guitar track. Embracing virtual technology allows access to a world of coveted audio flavors without the need for physical hardware, streamlining workflows and expanding creative possibilities.
Credit: www.canalsoundlight.com
Table of Contents
What Is A Digital Preamp?
A digital preamp, essential in the ‘Virtual Preamp Collection’, optimizes audio signals within the digital domain. This tool provides a simulated array of classic amplification tones, enhancing recordings with professional warmth and clarity.
Embracing the world of audio recording in the digital age opens doors to innovative tools like the virtual preamp. This high-tech solution manages to replicate the character and functionality of traditional preamplifiers, but in the digital realm, offering producers and engineers a new level of convenience and versatility.
Let’s dive into what makes these digital marvels an indispensable part of a modern recording studio.
The boundary between analog warmth and digital convenience blurs with the advent of the digital preamp. These are software-based tools designed to mold and amplify your audio signals with precision and character. Unlike their analog counterparts, digital preamps provide users with extensive control over their sound without the need for bulky hardware.
Features Of Digital Preamps
Before diving head-first into the numerous features of digital preamps, it’s essential to appreciate their game-changing attributes:
Flexibility: Digital preamps are renowned for their adaptability, allowing users to switch between different preamp models with just a few clicks.
Customization: The customization options are nearly limitless, giving you the ability to tweak every nuance of your audio signal to perfection.
Space-saving: They occupy zero physical space, making them perfect for minimalist setups or portable studios.
The Impact Of Digital Preamps On Sound Quality
Digital preamps stand out in their ability to impart a specific character to your recordings without the noise and inconsistencies sometimes found in analog gear. The sound quality remains consistent, and users can expect:
Clarity: These preamps offer immaculate clarity, ensuring that the true essence of the input source is captured.
Precision: The level of precision in sound shaping is unmatched, giving users the ability to fine-tune their audio with great detail.
Choosing The Right Digital Preamp For Your Project
When it’s time to pick the perfect digital preamp, consider several vital factors:
Genre compatibility: Certain preamps are tailored for specific genres, so align your choice with the style of music you’re producing.
Interface intuitiveness: Look for a digital preamp that offers an intuitive user interface, which makes the process of audio crafting effortless and enjoyable.
Navigating through the maze of virtual preamps can be an enlightening journey, and with a discerning ear and a focus on your project’s needs, the right digital preamp can elevate your sound to professional realms. Keep in mind that a good preamp is not just about boosting the signal’s level—it’s about enhancing and coloring the sound in a way that enriches the final product.
So start exploring, and find that perfect digital companion for your audio adventures.
What Are The Components Of A Preamp?
Explore the core elements of a preamp in our Virtual Preamp Collection, where gain control and equalization are the keystones. Dive into an array of inputs and outputs designed to shape your audio with precision, all digitally emulated for seamless integration.
Diving into the world of audio, a quality virtual preamp collection can be the secret sauce to getting that perfect sound. Whether you’re a recording artist, producer, or audiophile, understanding the building blocks of a preamp can truly elevate your auditory experience.
Let’s peel back the layers and examine what makes these audio enhancers tick.
Analog Warmth And Digital Precision
Many virtual preamps aim to recreate the rich sonic characteristics of analog hardware. They often feature:
Emulated Tubes or Transistors: These replicate the harmonic distortion that adds warmth and depth to the sound.
Modeled Class A or AB circuitry: This dictates how the preamp amplifies the signal, affecting the overall tone and dynamic response.
Gain Control And Input Staging
At the heart of a preamp’s function is signal amplification, and here’s how it’s typically managed:
Adjustable Gain Knob: This allows users to set the input level of the signal, thereby controlling the amount of amplification or gain applied.
Input Selector: Users can choose between different input types (like mic or line), each designed for specific signal levels.
Eq And High-pass Filter
A preamp’s tone-shaping capabilities are pivotal to its performance, offering:
Equalization (EQ) Controls: These adjust specific frequency bands, letting you sculpt the sonic character of the output.
High-Pass Filter: It removes low-frequency rumble, which can clean up the signal, especially when recording vocals or acoustic instruments.
Phantom Power And Pad
Modern recording often necessitates additional features that enhance versatility:
48V Phantom Power: This powers condenser microphones, essential for high-fidelity studio recording.
PAD Switch: By reducing the input signal’s amplitude, it prevents distortion when dealing with high-level sources.
Connectivity And Integration
The final piece of the puzzle is how a preamp connects within a digital workflow:
Virtual Input/Output Options: Seamless integration with digital audio workstations (DAW) is crucial, with various plug-in formats like VST, AU, or AAX.
Presets and Automation: Tailored presets for different instruments or vocals speed up the setup process, while DAW automation can fine-tune preamp parameters during mixing.
By dissecting the components of a virtual preamp, you’re not only gearing up with knowledge but also preparing to make informed decisions that will enhance your recordings. Whether it’s choosing the right gain levels or selecting an EQ preset, every detail contributes to achieving that pristine sound quality that captures listeners’ ears.
Remember, it’s not just about having tools, but knowing the intricacies that can make all the difference in your audio endeavors.
How To Make A Preamplifier?
Unlock the full potential of your audio setup with the Virtual Preamp Collection. Dive into the creation process by selecting the right software and tweaking settings to match your sound preferences, enriching recordings with unparalleled clarity and warmth.
Understanding The Basics Of Preamplifier Design
Before we dive into the nitty-gritty of creating your own preamp, it’s crucial to have a grasp of what a preamp does. Essentially, it’s an electronic amplifier that converts a weak electrical signal into an output signal strong enough to be noise-tolerant and strong enough for further processing.
Without this initial boost, the signal would lack the quality necessary for detailed audio work.
Choosing The Right Components
Quality of the components: High-quality electronic parts can significantly improve the performance of your preamp.
Compatibility and specifications: Make sure the components you select are compatible with each other and meet the necessary specifications for your particular design.
Crafting a preamplifier is analogous to cooking a gourmet meal; each ingredient must be chosen with consideration to ensure the final dish is sublime.
Schematic Design
Before you start soldering components together, you’ll need a blueprint. This is where schematic design plays a pivotal role.
Clarity of the schematic: Ensure your design is easy to read and understand.
Schematic design software: Employ a reliable software to help in creating accurate and clear schematics for your preamplifier.
Designing a schematic is like mapping out a treasure hunt; every connection needs to be marked clearly to reach the prize without any missteps.
Crafting The Circuit Board
Once your design is solidified, it’s time for the actual creation of the circuit board. This step must be approached with precision and patience.
Circuit board layout: A well-thought-out layout is key to a successful preamplifier.
Testing points: Don’t forget to integrate testing points to troubleshoot the preamp during and after assembly.
Think of the circuit board as the backbone of your preamplifier; it needs to be sturdy and functional to support all the intricate components that give it life.
Soldering And Assembling The Preamplifier
Soldering technique: Perfecting your soldering technique ensures reliable and long-lasting connections.
Step-by-step assembly: Follow your schematic and layout carefully to avoid any mistakes during assembly.
The process of soldering and assembling is a bit like completing a puzzle. Each piece needs to fit perfectly to achieve the desired picture – in this case, a fully functioning preamplifier.
Testing And Troubleshooting
After your preamplifier is assembled, testing is crucial. You’ll want to ensure everything is working correctly.
Use of testing equipment: Instruments like oscilloscopes and multimeters are indispensable for this phase.
Patience in troubleshooting: Listen to the audio output and adjust the components as necessary to refine the sound to your liking.
Imagine you’re a detective trying to crack a case when you’re testing and troubleshooting. Every clue (or misstep) you uncover gets you closer to the ultimate goal of impeccable sound.
Fine-tuning Your Preamplifier
Finally, fine-tuning is what turns a good preamp into a great one.
Adjustment of gain and impedance: Tweaking these settings can lead to significant improvements in sound quality.
Environmental considerations: Test your preamp in different environments to ensure consistent performance.
Like a musician tuning an instrument, fine-tuning your preamp will make sure it performs at its best, delivering clear and distinct sounds that can heighten any audio experience.
What Is The Function Of The Preamplifier?
A preamplifier boosts weak audio signals to a level that recording equipment can process. Essential for achieving studio-quality sound, the Virtual Preamp Collection replicates classic hardware preamp tones within a digital environment.
As audiophiles and music production enthusiasts continue to seek out the most authentic sound experiences, the use of virtual preamps has become increasingly popular. These virtual devices form the backbone of recording and sound amplification processes, providing a blend of modern finesse and classic warmth to digital audio workstations.
Let’s dive into the heart of these tools, understanding exactly what a preamplifier is designed to do within the intricate world of audio enhancement.
The Essential Role Of A Preamplifier
At its core, a preamplifier serves as the bridge between the raw signal from an audio source, like a microphone or an instrument, and the power amplifier that drives your speakers or headphones. Its primary function is to prepare the signal for further processing and amplification without significantly altering its original characteristics.
Boosting The Signal:
Impedance Matching: Transforms the signal to a level suitable for the power amplifier or recording device.
Sound Quality Enhancement: Adds warmth and depth, reproducing the character of vintage hardware.
The function of these preamps extends to signal conditioning as well. They adjust audio to an optimum level, which is crucial for retaining the nuances and fine details that define high-fidelity recordings. Fiddling with a virtual preamp’s controls, users can simulate different tonal characteristics, enriching their soundscapes with layers of audible textures that harken back to classic studio gear.
Tonal Shaping And Control:
Virtual preamplifiers come bearing a gift of versatility. Users can tweak settings to carve out their unique sound. This flexibility allows for:
Gain Control: Dial in the perfect level of amplification for each track.
Tonal Adjustments: Shape the signal’s frequency response to accentuate desired characteristics.
Navigating through a software preamp’s interface feels as close to handling actual studio equipment as it gets, providing instantaneous auditory feedback that’s both gratifying and inspiring. This interactivity makes virtual preamps an indispensable tool in the modern sound engineer’s digital arsenal, bridging proficiency with the warmth of tradition.
With seamless integration into digital audio workstations, virtual preamplifiers don’t just mimic their physical counterparts but bring forth a new era of sound manipulation, effortlessly merging the old and new. They serve to embolden your musical narrative, proving that in the quest for sonic perfection, innovation takes the lead.
What Is The Purpose Of A Preamp?
A preamp’s primary function within a Virtual Preamp Collection is to enhance audio signals before they reach further amplification stages. It ensures richer and clearer sound by boosting the signal without degrading quality.
Diving into the world of audio production, the preamp or preamplifier is pivotal in capturing the intricacies of sound. It serves as the initial stage of amplification in audio recording and live sound reinforcement.
Enhancing Signal Strength
Boosting weak signals: To make low-level audio from microphones or instruments louder, ensuring it can be processed without significant noise interference.
Matching levels: The preamp adjusts varying signal levels so that they are consistent and compatible with other audio equipment across the signal path.
Improving Sound Quality
A well-crafted preamp doesn’t just amplify sound; it enhances it. By refining the audio signal before it reaches additional stages of processing, you retain the original sound’s purity and detail.
Interfacing Microphones With Other Gear
Impedance matching: The preamp optimizes the connection between microphones and other audio devices, ensuring the signal transfers efficiently without quality loss.
Providing phantom power: Condenser microphones need direct current to operate, which a preamp supplies, allowing them to capture sound with clarity and precision.
Control And Flexibility
Delving deeper, a preamp gives you the reins to shape your sound at the very beginning of the signal chain.
Gain control: By adjusting the input signal’s amplitude, you dictate how soft or loud the sound needs to be, giving you artistic freedom.
Tone shaping: Essential controls allow manipulation of bass, treble, and sometimes mid-range frequencies, serving as the foundational tone sculpting tool.
Signal Routing And Processing
Direct outputs: Some preamps offer a direct output feature which allows the signal to be routed to different destinations, handy for both live and recording scenarios.
Inserting effects: Preamps can often integrate with other gear, providing opportunities to insert various effects, such as compression and EQ, before the signal hits the mixer or audio interface.
In the vibrant cosmos of audio work, a preamp remains a crucial component. By strengthening, enhancing, and providing versatility to audio signals, it lays down the foundation for outstanding sonic experiences. Whether in the studio or on stage, understanding the role of the preamp can make all the difference in achieving that perfect sound.
What Is The Output Of A Preamplifier?
The output of a preamplifier, particularly in a Virtual Preamp Collection, is an enhanced audio signal, ready for further processing or amplification. It boosts the weak input from an audio source to a line-level signal, ensuring clarity and volume without distortion.
Exploring the labyrinth of music production tools, one might stumble upon the virtual preamp, a key element in refining audio signals. Let’s delve into the significance of a preamplifier’s output and unearth what makes it a cornerstone in the journey from a raw sound wave to a polished auditory masterpiece.
The Purpose Of Preamplifier Output
Preamplifiers serve a vital role in preparing audio signals for further processing or amplification. They fulfill a dual mission: to boost the low-level output from audio sources up to a more robust signal, and to transmit it with minimal noise interference.
Essentially, they shape the audio quality before it reaches the power amplifier or recording device.
Characteristics Of Preamplifier Output:
Before dissecting the output nuances, it’s paramount to understand the characteristics defining a preamplifier’s output. These features dictate how the signal will interact with subsequent audio gear in the chain.
Output Level:
The preamp fortifies weak audio signals to line level, the standard operating level for pro audio equipment.
Impedance Matching:
By optimizing the output impedance, the preamp ensures maximum power transfer and compatibility with other devices.
Signal-to-Noise Ratio (SNR):
A higher SNR means the preamp effectively amplifies the signal while minimizing noise, resulting in crisp, clear audio.
The Importance Of Output Quality In Virtual Preamps:
When it comes to virtual preamps, the output quality is pivotal as it captures the essence of the modeled hardware. Software preamps are designed to emulate the warmth and nuances of their physical counterparts.
Faithful Emulation:
Virtual preamps aim to replicate the acoustic characteristics of vintage gears such as tube warmth and solid-state clarity.
Versatility:
With a high-quality output, virtual preamps can handle a diverse range of audio sources and genres.
Workflow Efficiency:
A stellar output from a virtual preamp can expedite the mixing process by delivering ‘mix-ready’ signals.
Embodying the traits of highly sought-after audio equipment, virtual preamps have carved a significant place in music production. As we peel back the layers of their output, it’s clear that a quality preamplifier can either make or break the audio experience.
It’s not merely about amplification, but about giving life to the music, facilitating a connection between the creator and the listener.
Credit: legacy.presonus.com
Frequently Asked Questions For Virtual Preamp Collection
What are preamps used for?
A preamplifier, or preamp, boosts weak electrical signals to a level suitable for further processing or transmission to a power amplifier and loudspeaker, ensuring a clean, noise-free final output.
Are preamps worth it?
Adding an external preamp is a fantastic way to enhance sound quality or expand your sound options. However, ensure you’ve optimized your setup first. Quality recordings can still be achieved with your interface’s internal preamps and a couple of good condenser mics.
Why do you need a pre amplifier?
“Preamp” can refer to either: a) the internal preamplifier circuit in a device, or b) a separate external device housing such a circuit. Its role is to boost weak signals to line level, the standard operating level for recording equipment.
Conclusion
An virtual preamp collection is a sonic revolution for any home studio or professional setup. It brings together versatility, quality, and cost-efficiency. As we’ve explored, these digital tools offer authenticity and convenience to producers and musicians alike. Dive into the world of virtual preamps; your mixes will thank you for the richness and clarity they can add.
Lethal Company VR is an immersive virtual reality experience. It blends gaming and storytelling in a unique VR environment.
Embark on an exciting journey with Lethal Company VR, which offers a cutting-edge blend of interactive storytelling and exhilarating gameplay tailored for virtual reality enthusiasts. This immersive VR adventure provides a captivating narrative that engages players with its intuitive controls and visually stunning environments.
Perfect for those seeking a new level of gaming immersion, Lethal Company VR stands out by delivering a memorable and high-adrenaline virtual experience. The game’s design utilizes VR technology to enhance player involvement, making every decision and action more impactful. Dive into a world of endless possibilities and discover the thrills that Lethal Company VR has in store for both VR newcomers and seasoned aficionados alike.
Embark on an immersive experience with Lethal Company VR, a cutting-edge virtual reality entertainment provider. Dive into their thrilling VR adventures that promise to elevate gaming to new exhilarating heights.
Embarking on a journey into the virtual reality realm, Lethal Company VR emerges as a trailblazing video game that intertwines immersive gameplay with an exhilarating narrative. Diving into this world means enveloping oneself in a digital combat experience that’s as intense as it is technologically advanced.
Let’s decode the essence of Lethal Company VR and unfold what makes it stand apart in the VR gaming landscape.
The Genesis Of Lethal Company Vr
Lethal Company VR was birthed from the vision of fusing high-octane action with a rich, interactive environment. The game was developed by a talented team revered for their craftsmanship in creating virtual worlds that resonate with players on multiple levels.
They have molded an experience that goes beyond mere gaming; it’s about stepping into a role and living out an adventure that was once confined to one’s imagination.
Core Gameplay Mechanics
Seamless integration of motion controllers: The game is engineered to exploit the full potential of motion controllers, providing an intuitive interface that accurately translates physical movement into virtual actions.
Original scoring system: An innovative scoring method rewards strategic play and skilful execution, giving adept players the recognition they deserve.
Energy and realism: Each interaction within the game is injected with an intensity that simulates a real-world combat scenario, elevating the player’s adrenaline levels.
Lethal Company VR doesn’t just stop at providing basic VR engagement; it is designed to push the boundaries of what’s possible, offering layers of depth to each encounter.
The Visual And Audio Landscape
When you don a VR headset to play Lethal Company VR, you’re treated to a feast for the senses. The visuals are cutting-edge, showcasing detailed textures, dynamic lighting effects, and realistic character models that bring this virtual universe to life.
The soundscape is equally impressive, with a meticulously crafted audio experience that wraps around you, heightening the drama and tension of every moment.
Social And Multiplayer Features
Community-driven events: Players are invited to participate in special events that encourage social interaction and test one’s mettle against others in the community.
Cooperative gameplay: Team up with friends or allies and tackle missions together, adding a layer of camaraderie and shared tactical decision-making.
By promoting social connections through its multiplayer components, Lethal Company VR fosters a sense of belonging among its player base, creating lasting memories and a loyal following.
Accessibility And Comfort
Striking a balance between immersion and player comfort, the developers have crafted Lethal Company VR with accessibility in mind. This means that whether you’re a seasoned veteran of virtual worlds or a newcomer ready to dip your toes into the VR waters, this game is crafted to adapt to your comfort level, ensuring that everyone can enjoy the thrill of the game without the common discomforts associated with VR.
Lethal Company VR isn’t merely a game; it represents a bold step forward in interactive entertainment. Through its blend of potent action, visual splendor, and community-centred features, it offers a window into what the future of gaming has in store.
Take the leap, and let Lethal Company VR transport you to a realm where every virtual battle fought is an epic tale waiting to be written.
How To Install Lethal Company Vr
Embark on an immersive adventure with Lethal Company VR by seamlessly downloading and installing it from your VR platform’s store. Follow the straightforward instructions to set up the game, ensuring your VR system meets the necessary requirements for an optimal experience.
Embarking on the thrilling journey of ‘Lethal Company VR’ starts with setting up the game on your preferred platform. This immersive experience will bring you to the edge of reality, testing your combat skills in virtual environments. Follow these straightforward steps and you’ll be ready to dive into action in no time.
Requirements For Installing Lethal Company Vr
Before you begin the installation process, it’s crucial to ensure your VR system meets the game’s specifications. Here’s what you need to get started:
VR Headset: Compatible with Oculus Rift, HTC Vive, or Valve Index.
Processor: Intel i5-4590 / AMD FX 8350 equivalent or greater.
Storage: Ensure you have sufficient space on your hard drive for the game installation.
It’s key to keep your VR system drivers up to date to avoid any potential performance issues.
Step-by-step Installation Guide
Now, let’s move on to the actual installation procedure. Make sure to follow each step carefully:
Launch your VR platform’s software (e.g., Oculus app, SteamVR).
Navigate to the store or library section within the software.
Use the search function to locate ‘Lethal Company VR’.
Select the game and click on the ‘Install’ button.
Once the download is complete, the game will automatically install.
After installation, you’ll find ‘Lethal Company VR’ in your VR library.
Put on your headset, start the game from your library, and prepare for combat.
Remember, a smooth installation process paves the way for an incredible VR gaming experience.
Common Troubleshooting Tips
Even with the most flawless setup, sometimes you might face technical glitches. Don’t let this disrupt your VR excursion; here are some tips that might help:
Ensure your VR headset is properly connected to your PC.
Restart your PC and VR equipment if the game fails to launch.
Check for game updates, as they can resolve known issues.
Verify the integrity of game files if you’re using a platform like Steam.
Contact customer support for your VR system if problems persist.
Arming yourself with these solutions will equip you for any challenges that may arise during installation.
Enhancing Your Vr Experience
After installing ‘Lethal Company VR’, there are ways to make your gameplay even more thrilling:
Adjust the in-game settings for optimal visual quality and performance matching your system’s capabilities.
Ensure your play area is clear of obstacles to avoid accidents while immersed.
Use high-quality headphones to enhance audio cues and immerse yourself deeper into the game’s world.
Taking these measures ensures your virtual combat experience is as lifelike and exhilarating as possible.
Embark on your ‘Lethal Company VR’ adventure equipped with this guide, and step into an electrifying virtual battlefield where your skills will be put to the ultimate test. Happy gaming!
Is Lethal Company Going To Be On Vr?
Immerse yourself in the action-packed world of ‘Lethal Company VR’, where virtual reality takes gaming to exhilarating new heights. Anticipation grows as fans eagerly await official announcements on its VR compatibility.
Virtual reality (VR) gaming is on the rise, with players yearning for immersive, pulse-raising experiences that bring them closer to the action. Lethal Company, the latest phenomenon in tactical games, has captured the attention of many enthusiasts eagerly wondering about its compatibility with VR.
The Vr Gaming Landscape And Lethal Company
While VR gaming is still blossoming, certain prerequisites have become essential for titles to succeed in this innovative platform:
Immersive Gameplay: A game must offer an environment that deeply engages the player, making them feel as though they are truly a part of the game world.
Fluid Controls: Effective and intuitive controls are necessary to prevent the disorientation that can occur with VR gaming.
High-Quality Graphics: Rich and detailed visuals enhance the realism of the VR experience.
Lethal Company, with its high-octane gameplay and focus on strategy, fits the VR mold, offering fertile ground for a VR adaptation.
Is Lethal Company Jumping Into Vr?
Excitement is building around the potential expansion of Lethal Company into VR territory. Let’s delve into the facts that suggest this possibility:
Development Teases: The creators have hinted at exploring VR options, mentioning their commitment to staying on the cutting edge of gaming technology.
Community Requests: A strong voice from the community, with numerous players expressing their desire to see Lethal Company in VR, has put pressure on the developers.
Market Trends: The growing market for VR gaming makes it a lucrative avenue for modern titles looking to expand their reach.
In light of these points, although there hasn’t been an official confirmation, the signs are promising for Lethal Company to embrace VR, potentially giving players an even more thrilling way to experience the game.
What This Could Mean For Fans
Should Lethal Company make the transition to VR, there are several implications for its fanbase:
New Gameplay Mechanics: Incorporating VR could introduce novel ways to interact with the game environment and execute tactics.
Community Growth: Venturing into VR can attract a new audience, while giving existing fans a fresh way to enjoy the game.
Elevated Competition: Enhanced realism in VR may lead to more competitive gameplay, offering a steeper, yet satisfying challenge for hardcore gamers.
Anticipation remains high, and fans are on the lookout for any official announcements regarding Lethal Company’s voyage into the world of VR. As the gaming industry continues to evolve, it’s games like Lethal Company that have the potential to define the next generation of immersive play.
Can You Play Lethal On Vr?
Dive into immersive combat with Lethal Company VR, an exhilarating gaming experience on virtual reality platforms. Experience high-intensity missions and realistic action as you team up or go solo in this cutting-edge VR environment.
Exploring the realms of virtual reality gaming is an exhilarating experience and many enthusiasts often wonder about the variety of games they can immerse themselves in. Specifically, regarding the game Lethal, players are curious to know if they can strap on their VR headsets and step into its world.
So, let’s dive into the facts: Is Lethal an experience you can enjoy in VR?
Compatibility With Vr Hardware
Before you get too excited about the idea of playing Lethal in virtual reality, it’s essential to check the compatibility of the game with various VR hardware.
Supported VR Headsets: Make sure the game supports your specific VR headset model.
PC Requirements: Understand the specifications needed from your computer to handle the VR version of Lethal.
Controllers Compatibility: Ensure that the game is compatible with the controllers of your VR system for a seamless experience.
Vr Gameplay Experience
When it comes to truly immersive gaming, VR has changed the game, and Lethal is no exception. Experiencing this game in virtual reality enhances every aspect, from how you interact with the environment to how the game’s world envelops you.
Immersion Level: The game’s virtual reality integration elevates your sense of being in the game.
Game Mechanics: Discover how VR gameplay affects the mechanics of Lethal, making them more intuitive and engaging.
Social Interaction: Find out if and how you can interact with other players within the VR space of Lethal.
Playing Lethal in VR offers a completely distinct feel from traditional gaming. Once you put on that headset, the game’s atmosphere, the intensity of the combats, and the strategic depth come alive in a way they can’t on a flat screen.
It’s not just about playing a game; it’s about living inside its pulsating universe.
Can You Play Lethal Company Vr With Non-vr?
Lethal Company VR is designed exclusively for virtual reality, offering an immersive experience that non-VR setups cannot replicate. Players without VR equipment will need to upgrade to dive into this engaging VR gameplay.
Diving into the world of virtual reality can be electrifying, yet sometimes you might yearn for a more traditional gaming experience. This raises the question: is it possible to engage in the thrills of Lethal Company VR without donning a headset?
Let’s explore this topic and unravel the options available for gamers who prefer to keep their feet in the real world while their minds battle in virtual arenas.
Compatibility Of Lethal Company Vr With Non-vr Platforms
Lethal Company VR was designed to immerse players in a fully interactive 3D environment, which typically requires virtual reality hardware. Although the game’s core experience is built for VR, let’s shed some light on how it functions without it:
Native non-VR support: Details on whether the game can be launched and played without VR equipment.
Alternative control schemes: An outline of different control setups that mimic VR actions using standard gaming peripherals.
Visual adjustments: Information on the graphical changes implemented to accommodate a 2D screen experience.
Experiencing Lethal Company Vr Outside The Headset
Embarking on the Lethal Company VR journey without virtual reality might seem less immersive, but here’s how the gameplay adapts to a flat-screen format:
The game developers understand the appeal of VR but also recognize the need for flexibility. They’ve worked meticulously to devise a parallel experience for players using a monitor or TV. The transition from a panoramic view to a traditional screen may alter some tactical aspects, but the essence of the game’s strategy and narrative remains intact.
Social Play: Vr And Non-vr User Interaction
Bringing together friends regardless of their hardware preferences is a cornerstone of gaming inclusivity. Let’s delve into how Lethal Company VR bridges the gap:
Cross-platform play: The game’s capability to support multiplayer sessions between VR and non-VR players.
Communication features: How the game facilitates interaction among players using different devices.
Matchmaking balance: Whether there are systems in place to ensure fair play between those in VR and those without.
Playing Lethal Company VR without the headset can be a unique experience. With the right measures in play to ensure cross-platform harmony and gameplay balance, the game can bring together a diverse community of gamers. So grab your controller or keyboard, and step into the world of Lethal Company VR – no headset required!
Credit: www.youtube.com
Frequently Asked Questions For Lethal Company Vr
Does Lethal Company Support Vr?
Lethal Company currently does not offer VR support. The game is playable on standard gaming platforms without virtual reality features.
Can You Play Lethal On Vr?
Yes, you can play Lethal VR, a virtual reality shooting simulator, using compatible VR headsets. This immersive experience is available on platforms like the PlayStation VR and Steam for PC.
Can I Play Lethal Company Vr With Non-vr?
No, Lethal Company VR requires a VR headset to play, as it’s designed exclusively for virtual reality experiences.
How Do I Download Lethal Company In Vr?
To download Lethal Company in VR, visit the official website or platform store, choose the VR version, and click ‘Download. ‘ Ensure your VR headset is compatible before proceeding with the installation.
Conclusion
Navigating the realms of Lethal Company VR has been an adventure like no other. It’s clear this game sets a new bar for immersive experiences. With its engaging gameplay and stunning graphics, it stands out as a must-try for VR enthusiasts.
Embrace the challenge, immerse yourself, and become part of the Lethal Company. Your VR journey awaits!
A Round Wood Coffee Table is a versatile furniture piece that adds warmth and function to any living space. Its circular shape promotes easy movement and sociable interaction.
Selecting the perfect Round Wood Coffee Table can elevate your living room’s aesthetic and usability. This type of table often acts as a central focal point, inviting guests to gather and enhancing the room’s overall charm. Crafted from materials like oak, walnut, or reclaimed wood, these tables bring a touch of nature indoors, while their sturdy construction promises durability.
With a range of styles from rustic to modern, a wood coffee table can seamlessly integrate into your decor. Consider its size, height, and finish to ensure it fits well with your existing furniture and meets your functional needs. Whether serving as a spot for your morning coffee, a display for books and flowers, or simply as a place to rest your feet, a round wood coffee table combines practicality with aesthetic appeal, making it a smart addition to any home.
Credit: interiorstylehunter.com
How To Make A Round Wood Coffee Table
Crafting a round wood coffee table adds a touch of elegance to any living space. Begin with selecting a quality wood slab, then shape and sand it until smooth, ensuring a classic and chic finish.
Choosing The Right Wood For Your Table
Crafting the perfect round wood coffee table starts with selecting the right wood. The type of wood will not only define the look of your table but also its durability and resistance to wear. Consider hardwoods like oak, maple, or walnut for a sturdy table surface.
Softwoods such as pine can be cost-effective, but may not endure as well over time.
Preparing The Wood
Wood selection: Choose a wood species that suits your aesthetic preference and budget.
Sizing: Ensure you purchase wood that fits the dimensions of your desired table size.
Sanding: Smooth the wood surface with fine-grit sandpaper to prepare it for staining or sealing.
Sealing: Apply a wood sealant to protect it from moisture and increase its longevity.
Craftsmen understand the importance of starting with a smooth, prepared surface. This ensures your final product will be both stunning and functional.
Designing Your Table Top
Ambition meets design in the creation of your table top. Begin by sketching the dimensions onto your wood, keeping in mind the desired thickness for a solid and stable surface. Once your design is in place, you’re ready to cut.
A band saw is the tool of choice for making circular cuts with precision. After the initial cut, follow up with a router for a uniformly rounded edge.
Crafting The Table Base
Crafting a durable base for your round coffee table is crucial for stability and style. The design options are endless; whether you opt for a traditional four-legged base or a more contemporary pedestal design, the base should complement your table top both visually and functionally.
Stability is key: Ensure the base is proportionate to the top for balance.
Joinery: Use sturdy joinery techniques like mortise-and-tenon or dowels for a long-lasting hold.
Design: Match the base style to the top for a cohesive look.
Finishing touches: Sand and finish the base to match the table top for a seamless appearance.
Matching the craftsmanship of the top, the base should stand firm, promising to support your cozy evenings and coffee chats for years to come.
Final Assembly And Finishing
Enter the home stretch of your project with the final assembly. Attach the top to the base using screws that are long enough for a secure hold, but short enough to prevent poking through the surface. It’s recommended to pre-drill holes to avoid wood splitting.
With the table assembled, apply your chosen stain or finish in even coats, allowing time to dry between applications. This not only enhances the beauty of the wood but also safeguards your creation against daily wear.
Maintaining Your Handcrafted Table
Your round wood coffee table isn’t just a piece of furniture; it’s a testament to your craftsmanship. To keep it looking its best:
Regular cleaning: Use a soft cloth to wipe away dust and spills.
Avoid heat and moisture: Protect the surface with coasters and trivets.
Periodic resealing: Depending on usage, reapply sealant to prevent water damage and maintain the wood’s integrity.
By following these care tips, your coffee table will remain the centerpiece of your living space, much-admired and well-utilized.
Introduction To Round Wood Coffee Tables: A Classic Addition To Any Space
Embrace timeless elegance with a round wood coffee table as the centerpiece of your living area. Its circular design and natural material offer both functional charm and a touch of classic warmth to any room’s aesthetic.
Round wood coffee tables have long been cherished for their timeless elegance and the warmth they bring to living spaces. Whether nestled in a cozy apartment or taking center stage in a spacious house, these furniture pieces are as versatile as they are stylish.
They offer a hint of classic sophistication while also providing a functional surface to gather around.
The Appeal Of Round Wood Coffee Tables
The round wood coffee table is more than just a piece of furniture; it’s a style statement that unites form and function. Its circular shape creates a sense of community, encouraging conversation and interaction among those seated around it. Wood, as a natural element, adds warmth and texture, making each table unique with its own grain patterns and hues.
Versatile Design Options
Material combinations: A wooden top paired with metal legs can merge rustic charm with industrial chic.
Size variations: From petite tables that fit snugly in tight corners to larger ones that anchor a living room, there is a size to suit every space.
Style varieties: Whether your taste leans towards modern minimalism or traditional opulence, you’ll find designs that complement your home’s aesthetic.
Round wood coffee tables can effortlessly adapt to any design theme or functional need, making them a smart choice for both small and large rooms. They serve as both focal points and as subtle complements to other furnishings, illustrating the incredible diversity within this category of home furniture.
Functionality And Utility
Beyond aesthetics, these tables offer an array of practical benefits. The lack of sharp edges makes them a safer option for households with children, while the round shape allows for easier navigation in tight spaces. Each table’s surface is a blank canvas for everyday life – ready to hold your morning cup of coffee, favorite books, or beautiful floral arrangements.
Care And Maintenance Tips
Regular dusting: Gentle dusting preserves the beauty and integrity of the wood.
Immediate spill cleanup: To prevent staining, quickly wipe away any spills.
Use of coasters: Protect the wood from moisture rings and heat marks.
Maintaining your round wood coffee table is straightforward and ensures its longevity. With the right care, these solid furniture pieces can last for generations, becoming cherished heirlooms with stories and memories embedded in their surfaces.
Round wood coffee tables are timeless centerpieces that can transform any living space with their elegance and practicality. Their adaptability in style, size, and functionality makes them an outstanding choice for any homeowner. With minimal maintenance, they promise to be a lasting investment that perpetuates beauty and utility in your daily life.
Materials And Tools: What You’ll Need To Craft Your Own Round Wood Coffee Table
Embark on creating a bespoke round wood coffee table with the right materials and tools. Gather high-quality lumber, a reliable saw, sandpaper, and finishing supplies to transform raw wood into a stunning centerpiece.
Crafting a round wood coffee table from scratch can be both a gratifying and stylish addition to your home. This hands-on project is not just about creating a functional piece; it’s about making a statement furniture item that reflects your personal taste and craftsmanship skills.
To ensure a smooth and successful build, you’ll need to gather specific materials and tools before you get started. With the right preparation, you can transform raw materials into a beautiful and durable coffee table.
Essential Wood Materials
For your DIY round wood coffee table, you’ll want to choose wood that is both aesthetically pleasing and sturdy. Here’s what you’ll need:
Solid wood planks: These will form the tabletop. Types like oak or maple are popular for their durability and grain.
Dowels or biscuits: Essential for joining the planks securely.
Wood glue: Provides a strong bond between wooden parts.
Sandpaper (various grits): Smooths the tabletop and edges for a polished look.
Wood stain or sealant: Protects and enhances the natural wood color.
Tools For Woodworking
Equipping yourself with the proper tools is key to efficiency and precision. You’ll need:
A saw: Circular saw or table saw to cut the planks into a round shape.
Biscuit joiner or doweling jig: For aligning and connecting the wood planks.
Clamps: To keep the wood planks in place while the glue dries.
Orbital sander: Saves time and effort in sanding the wood surface.
Drill: A power drill for making holes for dowels or screws.
Measuring tape and pencil: For accurate measurement and marking.
With this collection of materials and tools at your disposal, you can embark on the journey of creating a one-of-a-kind round wood coffee table that’s both practical and captivating. Each selection has its own role in bringing your vision to life, emphasizing the importance of preparation and attention to detail in do-it-yourself projects.
Dive into the creative process and revel in the satisfaction of building something truly unique.
Step-by-step Guide: Building Your Round Wood Coffee Table From Start To Finish
Embark on a crafting journey to create your own elegant round wood coffee table with our comprehensive guide. Discover the essentials of transforming raw materials into a stunning centerpiece to enhance your living space.
The excitement of crafting your own furniture brings a sense of pride and personalization to your home decor. When you embark on the journey of building a round wood coffee table, you’re not just creating a piece of furniture, you’re manifesting your vision.
Delve into our step-by-step guide and transform simple wood planks into a stunning conversation piece for your living room.
Planning And Designing Your Coffee Table
Before sawdust starts to fly, it’s crucial to have a game plan. This involves selecting the right type of wood, considering the size and height of your table, and finalizing the design aesthetic that aligns with your space. Bear in mind the longevity of the material and the functional requirements, such as weight capacity and resistance to wear and tear.
Gathering Tools And Materials:
Wood selection: Choose a hardwood such as oak, maple, or walnut for durability and a beautiful finish.
Measuring tape and pencil: For precise measurements and markings.
Jigsaw and sandpaper: To cut out your round shape and smooth the edges.
Screws and wood glue: Essential for sturdy assembly.
Stain or varnish: To protect the wood and enhance its natural beauty.
Cutting The Tabletop:
Start this exciting phase by transferring your measurements onto the wood, ensuring accuracy and symmetry for the perfect circle. With your safety gear on, guide the jigsaw with a steady hand to cut along the marked lines. Once the cutting is done, patiently sand the edges until they are smooth, maintaining a circular shape that’s free from splinters.
Assembling The Base And Apron:
Base structure: Construct a sturdy base using four legs, ensuring they are cut to the same length for stability.
Apron attachment: Connect the legs with an apron—a horizontal frame that reinforces the structure and supports the tabletop.
Joining elements: Secure the legs to the apron using strong joinery techniques that suit your skill level and the design.
Attaching The Tabletop To The Base:
Carefully center the tabletop on the frame and attach it with screws from underneath for a seamless look. This pivotal step turns separate parts into a cohesive whole, ensuring that the table will stand firm and bear the weight of your coffee mugs, books, and decorative items confidently.
Finishing Touches:
Devote time to sand the entire table, moving from coarse to fine-grit paper for an ultra-smooth finish. Apply your chosen stain or varnish with an even hand, highlighting the wood’s organic patterns and protecting it from everyday use. Allow ample drying time before bringing your new creation into its designated spot in your home.
Embark on this DIY venture with enthusiasm, and watch as the beauty of natural wood transforms into an elegant round coffee table that reflects your craftsmanship and taste. Through this pursuit, not only do you gain a unique piece of furniture but also the invaluable experience of creating something from scratch.
Incorporating Your New Round Wood Coffee Table Into Your Home Décor: Styling Tips And Ideas
Elevate your living space with a round wood coffee table, a versatile centerpiece that merges form and function. Discover creative ways to style this elegant furnishing, ensuring it complements your interior aesthetic while serving practical needs.
Choosing The Perfect Spot For Your Round Wood Coffee Table
Discovering the ideal location for your new round wood coffee table can transform the ambiance and functionality of your living space. It’s all about striking a balance between visual appeal and practical convenience. Consider placing it centrally in your seating area to foster an inclusive vibe, making it the communal hub of your room.
Its rounded edges are not only stylish but also child-friendly and help to soften the overall look of your interior design.
Harmonizing With Your Existing Furniture
Visual continuity:
Ensure your table complements the existing furniture in texture, color, or style. A round wood table with a similar finish to your bookshelves or TV stand can tie the room together nicely.
Proportion and balance:
The size of your coffee table should be proportionate to your sofa and chairs. It shouldn’t overpower or be dwarfed by surrounding furniture, creating a well-balanced setting.
Accents And Accessories To Adorn Your Table
Adding a personal touch to your round wood coffee table is both fun and expressive. Think of it as the canvas for your interior decor aspirations. Carefully selected items can serve as both stylish accessories and conversation pieces:
Books and magazines:
A neat stack of your favorite literature invites guests to peruse and often sparks interesting discussions.
Plants and flowers:
A small potted plant or a vase of fresh flowers brings life and a pop of color to your space.
Maintaining The Aesthetic Appeal Of Your Coffee Table
Preserving the beauty of your round wood coffee table is paramount to ensuring it remains an integral part of your home decor for years to come. Regular cleaning with the right products will keep the wood looking fresh. Use coasters to prevent rings from forming and consider felt pads underneath objects to prevent scratches.
Remember that wood can change color with prolonged exposure to sunlight, so positioning your table away from direct rays can help maintain its original hue.
Entertaining Around Your Coffee Table
Your round wood coffee table can be more than just a decorative piece; it plays a key role when entertaining guests. Its shape naturally encourages group interaction:
Serving space:
Utilize it as a chic serving area for snacks and drinks during social gatherings.
Game central:
A great spot for board games or card play, ensuring that everyone can reach and participate.
By incorporating these styling tips into your home decor strategy, you craft an environment that is both aesthetically pleasing and highly functional. Your round wood coffee table will not only stand out as a stunning centerpiece but also serve as a testament to your thoughtful approach to interior design.
Credit: www.amazon.com
Frequently Asked Questions
Does A Round Coffee Table Make A Room Look Bigger?
A round coffee table can create the illusion of more space, making a room seem larger. Its curved edges promote better flow and reduce visual clutter.
Does A Round Coffee Table Take Up Less Space?
A round coffee table can save space due to its lack of corners, making it easier to maneuver around in tighter spaces.
Why Use A Round Coffee Table?
A round coffee table enhances flow in a room by alleviating sharp corners. It’s perfect for tighter spaces and encourages a communal feeling, making it ideal for social interactions and relaxed lounging areas.
Are Round Coffee Tables Practical?
Round coffee tables are practical for various living spaces. They offer a flexible design, enhancing flow and accessibility. With no sharp corners, they are also safer in homes with children. Round tables fit well in smaller rooms or tight spaces, maximizing the area’s utility.
Conclusion
As we wrap up, remember that a round wood coffee table offers both style and versatility. It’s not just a piece of furniture, but a focal point that brings warmth and charm to your living space. Whether you favor rustic charm or modern simplicity, this timeless choice will certainly elevate your home décor.
Embrace the beauty of circular design in your next furniture update.
A wood burning stove is an efficient heat source that also offers a cozy ambiance. These stoves use firewood as fuel, providing a sustainable heating option.
Wood burning stoves are a timeless addition to any home, combining aesthetic appeal with functional warmth and energy efficiency. With the rising cost of conventional heating methods, a wood stove serves as a cost-effective alternative, significantly reducing reliance on fossil fuels and electricity.
Ideal for those living in regions with ample wood resources, they ensure a self-sufficient heating system. The charm of a real wood fire brings a rustic feel to interiors while modern designs offer improved safety features and cleaner combustion. For homeowners interested in eco-friendly solutions, the latest models of wood burning stoves meet strict environmental standards, decreasing carbon emissions. Proper installation and maintenance are key to maximizing the benefits and longevity of a wood burning stove.
Credit: dreifussfireplaces.com
How To Install A Wood Burning Stove
Installing a wood burning stove involves selecting the right model for your space and preparing a non-combustible base. Proper venting through a safe chimney system is crucial for efficient and safe operation.
Choosing The Right Location
Before diving into the installation process of a wood-burning stove, it’s crucial to select the appropriate spot within your home. Safety, convenience, and efficiency should all guide your decision. Look for a location with suitable clearance from combustibles and access to a chimney or vent pipe.
Preparation And Safety Measures
Gather your tools and materials: A successful installation starts with having everything you need on hand. Prepare your tools, stove pipe, chimney liner, and fireproof materials.
Check local codes and regulations: Ensure your installation complies with local building codes. This includes obtaining any necessary permits and following specified safety standards.
Table of Contents
Installing The Stove Pipe
For a wood-burning stove to function properly and safely, a correctly installed stove pipe is paramount. It serves as the conduit for smoke and gases to exit your home. When installing the stove pipe, remember to maintain a certain distance from any combustible materials and to ensure that all the joints are properly sealed and supported.
Securing The Stove In Place
Level the stove: Ensure that the stove is perfectly leveled on a non-combustible surface. This step is crucial for both performance and safety.
Anchor the stove: Using the manufacturer’s guidelines, secure the stove to the floor to prevent any accidental movement.
Final Inspection And Testing
Do a thorough check of all the connections and seals in your wood stove installation. After you’ve reviewed every detail, it’s smart to perform a small, controlled fire to test the system. This will allow you to observe any potential issues like smoke leaks or inadequate ventilation, granting you the chance to rectify them before full use.
Remember, installing a wood-burning stove is a complex task that may require professional expertise. Always prioritize safety and quality workmanship to enjoy the warmth and ambiance provided by your new stove.
How To Use A Wood Burning Stove
Ensure your wood burning stove is properly ventilated before lighting a small kindling fire. Gradually add larger logs to maintain consistent heat, regulating the air intake to control the burn rate.
Getting Started With Your Wood Burning Stove
The allure of a crackling fire on a cold night is timeless—and with a wood burning stove, you can enjoy this cozy comfort efficiently. Before diving in, it’s crucial to understand the proper methods for using your stove to ensure safety, efficiency, and a satisfying burn.
Choosing The Right Wood
Seasoned Wood: Only use wood that has been dried for at least six months to a year. Seasoned wood produces more heat and less creosote buildup.
Hardwood Versus Softwood: Hardwoods like oak and maple burn longer and are ideal for sustained heat. Softwoods like pine ignite quickly and are great for kindling.
Preparing The Stove
Preparing your wood burning stove is paramount for a safe and effective fire. Start by cleaning any ash from previous burns, ensuring the stove is free of debris. Check the damper is open to allow air to flow—the key ingredient for fire to thrive.
Lighting The Fire
Kindling Placement: Arrange your kindling on a bed of newspaper in a crisscross pattern to enhance airflow.
Ignition: Light the newspaper in several spots. As the kindling catches, the heat will rise, pre-warming your stovepipe for better draft.
Adding Logs: Once your kindling has formed a steady flame, gradually add larger logs to build up the fire.
Operating Your Stove Efficiently
A thriving fire needs attention. Regulate the air intake to control the burn rate. Too much air can cause rapid burning with less heat output, while too little suffocates the fire. Finding a balance is the secret to an efficient burn that warms your home and your heart.
Maintaining Safety
Keep the Area Clear: Ensure a clearance of at least 36 inches around the stove. Non-combustible floors and walls are a must.
Regular Inspections: Regularly inspect and maintain your stove and chimney. Professional cleanings are necessary to prevent dangerous creosote accumulation.
Smoke Detector and Carbon Monoxide Alarm: Equip your home with these safety devices and test them monthly.
Maximizing Heat Distribution
Get the most out of your stove by using fans to circulate warm air throughout your space. For multi-level homes, leaving doors ajar can allow heat to rise naturally, creating a more comfortable environment without the need for additional heating.
Let The Flames Extinguish Naturally
As the evening unwinds, resist the temptation to add more logs. Letting the fire burn down and cool overnight is safer and helps with cleaning out ash the next day. By morning, you’ll be left with a thin layer of ash that can be easily removed, setting the stage for your next cozy encounter with your wood burning stove.
Can You Burn Coal In A Wood Stove
Burning coal in a wood stove isn’t typically recommended due to potential damage to the stove. Wood burning stoves are designed for wood fuel, and the higher temperatures from coal can compromise their structure and safety features.
Can You Burn Coal In A Wood Stove?
When exploring the possibilities of fueling a wood-burning stove, one might wonder if coal is a viable option. The compatibility of coal with wood stoves is not a straightforward matter and requires careful consideration of the stove’s design and manufacturer’s recommendations.
Factors To Consider Before Burning Coal
Before you toss a lump of coal into your stove, it’s essential to understand the various factors that come into play:
Stove Design: Not all wood stoves are built to handle the higher burning temperatures of coal. This difference can impact the longevity and safety of your appliance.
Manufacturer’s Guidelines: Always consult the manual or reach out to the manufacturer. They provide the most accurate guidance on what fuels your stove can safely burn.
Heat Output: Coal generally burns at a hotter temperature than wood, which can affect how you manage your stove and the heat distribution in your home.
Risks Of Burning Coal In A Wood Stove
Opting to burn coal in a stove designed exclusively for wood can pose several risks:
Damage to Stove: The intense heat generated by coal can warp or crack parts not built for such high temperatures, leading to costly repairs or replacements.
Health and Safety Concerns: Coal produces different emissions compared to wood, which can lead to unsafe levels of carbon monoxide and other harmful substances if your stove and chimney system are not equipped to handle them.
Voided Warranty: Using fuels not approved by the manufacturer could void your stove’s warranty.
Best Practices For Burning Coal
If your stove is indeed suitable for coal, here are some best practices to ensure optimal and safe burning:
Fuel Quality: Source high-quality coal that’s appropriate for stove burning to ensure cleaner combustion and fewer harmful emissions.
Proper Ventilation: Ensure your chimney and flue are in top condition to handle the different exhaust coal produces.
Taking these points into account, it becomes clear that burning coal in a wood stove is not a matter to be taken lightly. Should you choose to pursue this route, diligence and adherence to safety guidelines are paramount. Remember, the goal is to enjoy the cozy warmth of your stove without compromising on safety or efficiency.
Can You Burn Pine In A Wood Stove
Burning pine in a wood stove is typically not recommended due to its high resin content, which can lead to creosote buildup. Opt for hardwoods in your wood-burning stove to ensure a safer, cleaner burn.
Can You Burn Pine In A Wood Stove?
When dealing with wood stoves, choosing the right type of firewood is crucial to the efficiency and safety of your heating experience. Many people often question whether pine, a commonly found softwood, is suitable for burning in their wood stoves.
So, let’s dive into the details.
Pros Of Burning Pine
Before tossing pine logs into your wood stove, consider the positive aspects:
Quick Ignition:
Pine wood is known for its ability to catch fire rapidly due to its high resin content, making it an excellent choice for kindling.
High Availability:
Pine trees are abundant in many regions, offering a readily available source of wood for those in pine-rich areas.
Cons Of Burning Pine
On the opposite side of the spectrum, burning pine isn’t free from drawbacks:
Creosote Buildup:
Pine burns at a lower temperature, which can lead to an increased risk of creosote accumulation in your chimney, potentially causing blockages or even chimney fires.
Short Burn Time:
As a softwood, pine tends to burn faster and not as hot as hardwoods, meaning you’ll need to replenish your wood supply more often to maintain the heat.
Best Practices For Burning Pine In A Wood Stove
If pine is what you have, here’s how to use it effectively:
Seasoning the Wood:
Ensure that pine wood is properly seasoned, with a moisture content below 20%, to minimize creosote buildup and maximize the heat produced.
Mixing with Hardwoods:
Combine pine with denser hardwoods in your stove. This allows the pine to serve as kindling, and the hardwoods to provide a longer, consistent burn.
Regular Maintenance:
More frequent chimney inspections and cleanings are a must when burning pine to prevent any dangerous creosote-related incidents.
In Summary
Pine can certainly be a part of your wood stove fuel strategy, as long as it’s utilized thoughtfully and with proper precautions. By acknowledging both the advantages and disadvantages of this softwood, you can enjoy the warmth of your wood stove while keeping safety as the top priority.
Remember, responsible wood burning is the key to a cozy and secure home.
How To Clean Wood Burner Stove Glass
Maintain the clarity of your wood burning stove’s glass with a simple cleaning routine using a damp cloth dipped in ash. For stubborn residue, a specialized wood burner glass cleaner provides a streak-free shine, ensuring a clear view of those cozy flames.
There’s something undeniably cozy about a wood-burning stove, with its crackling logs and warm glow lending a timeless allure to any room. Yet, the window to this warmth can often become marred by soot and residue, obscuring the flickering flames.
Keeping the glass clean is not just about aesthetics; it also allows you to monitor the burning efficiency of your stove. Let’s delve into the steps to ensure that your wood burner stove glass remains spotless, allowing you to enjoy the full spectacle of fiery tranquility.
The Importance Of Regular Cleaning
Ensuring that you maintain the glass of your wood burner stove is essential for both visual and practical reasons. Regular cleaning can prevent permanent staining and can increase the efficiency of your wood stove. It is a simple task that, if done routinely, can save you time and ensure better combustion visibility.
Materials Needed For Cleaning:
Gathering the right materials before you start will make the cleaning process smoother:
Newspaper or paper towels: For wiping the glass.
Water or vinegar: Acts as a natural cleaning agent.
Ashes from the stove: A natural abrasive that helps in removing stubborn stains.
Soft cloth: Used for the final polishing of the glass.
Step-by-step Cleaning Process
A systematic approach will help you achieve streak-free results efficiently:
Prepare the area: Make sure the stove is cool before you begin to prevent any burns.
Remove loose soot: Wipe the glass with a dry paper towel to get rid of any loose debris.
Create a cleaning paste: Mix a small amount of water or vinegar with ash to form a paste.
Apply the paste: Using a damp newspaper, apply the paste to the glass in a circular motion.
Wipe clean: After the residue loosens, wipe the glass with a clean paper towel.
Buff the glass: For a streak-free look, buff the glass with a soft dry cloth.
Tips For Preventing Soot Buildup
Prevention is always better than cure, especially when it comes to maintaining your wood stove’s glass. Here are some measures you can take:
Burn dry, seasoned wood: Less moisture means cleaner combustion, resulting in fewer deposits on the glass.
Maintain a hot fire: A fire that’s too cool is likely to create more smoke and soot.
Adjust the air flow: Proper ventilation can help the fire burn more cleanly.
By adhering to these tips and regularly cleaning your wood burner stove glass, you can enjoy the uninterrupted beauty and warmth of your fire throughout the cold seasons. Remember, care and maintenance are the secrets to any long-lasting appliance, and your cherished wood stove is no exception.
Credit: www.realsimple.com
Frequently Asked Questions
Is It Worth Getting A Wood Burning Stove?
Yes, getting a wood burning stove can be worth it for efficient heating, a cozy ambiance, and potential savings on utility bills. Ensure it fits your home’s requirements and local regulations.
What Are The Disadvantages Of A Wood Burning Stove?
Wood burning stoves require regular maintenance and cleaning. They pose potential fire hazards and emit pollutants, affecting indoor air quality. Installation can be costly, and they need a steady supply of firewood. Heating consistency might also vary based on wood type and stove efficiency.
What Is The Best Wood Burning Stove For The Money?
The best wood burning stove for value is the Drolet HT-3000. It offers efficiency, durability, and heats large spaces at a reasonable price.
What Is The Most Heat Efficient Wood Burning Stove?
The most heat efficient wood burning stove is one certified by the Environmental Protection Agency (EPA), often featuring advanced combustion technology that achieves high efficiency and low emissions. Look for models with high EPA ratings for optimal performance.
Conclusion
A cozy hearth awaits with a wood-burning stove, marrying rustic charm with sustainability. Embrace its warmth and cost-effectiveness in your home. As seasons change, so will your appreciation for this timeless heating gem. Ready to stoke the fire? Your perfect stove is just a choice away.


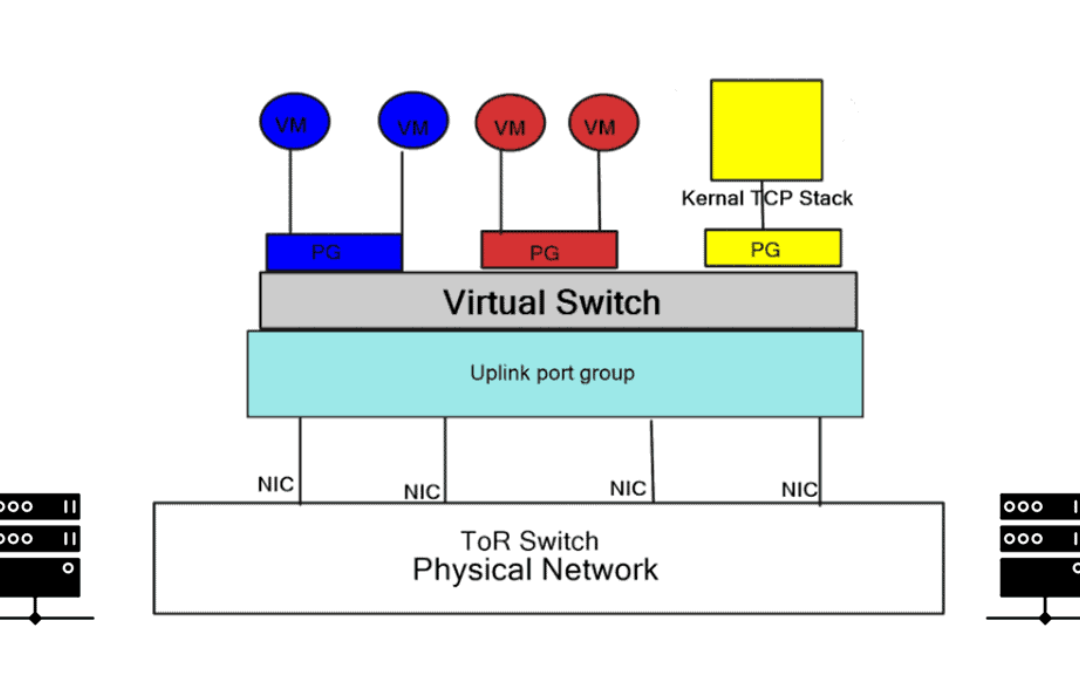


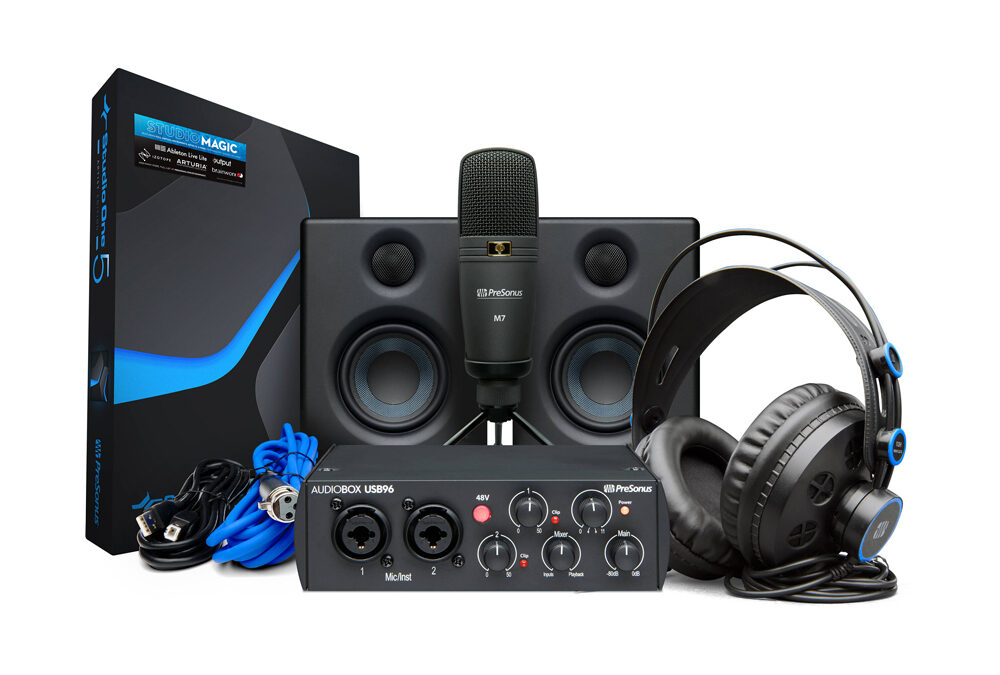


:max_bytes(150000):strip_icc()/pan-oil-food-ictcrop_300-bc28c2bd4ab04ff9b43fd912ccbf5284.jpg)